Page 4 of 12

Re: Waiex Build Status and Completion Photos

PostPosted: Thu Oct 13, 2011 8:04 am
by Andy Walker
Hey Mike...

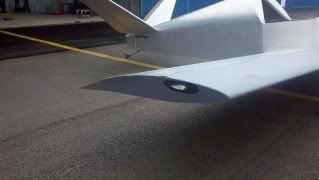
I'm currently thinking about placement of my (Van's) NACA vents...how did you decide where to place yours, and how are you routing any tubing to reach the actual vents? I'd like to run tubing to vents in the panel, but as Kip pointed out to me it can be a challenge to do so while avoiding conflicts with the flap & brake handles and other essential areas. If I can't figure it out I'll just put eyeballs directly on the ends of the NACA vents, but then the air is blowing on your legs instead of your face, which is a big difference in summer in Georgia. :lol:

Re: Waiex Build Status and Completion Photos

PostPosted: Thu Oct 13, 2011 5:14 pm
by MichaelFarley56
Hi Andy,

A lot of my NACA placement was by eyeball with the thought of getting them as high as possible to avoid brake and flap handle interference. With that in mind I also pushed them as far forward as possible, getting them close to that vertical angle. (sorry, I don't have my plans but it's the channel that the rudder bars attach to). I don't have my panel installed yet (working on it) but once done there will only be around 12" or so of flexible tubing needed to go from the vent to the other one in my panel. I'm hoping to keep the hose high enough that there won't be any interference, but it will be close. I'll hopefully be able to tell you more in a week or two, once my panel is installed.

Re: Waiex Build Status and Completion Photos

PostPosted: Fri Oct 14, 2011 12:56 pm
by Andy Walker
MichaelFarley56 wrote:Hi Andy,

A lot of my NACA placement was by eyeball with the thought of getting them as high as possible to avoid brake and flap handle interference. With that in mind I also pushed them as far forward as possible, getting them close to that vertical angle. (sorry, I don't have my plans but it's the channel that the rudder bars attach to). I don't have my panel installed yet (working on it) but once done there will only be around 12" or so of flexible tubing needed to go from the vent to the other one in my panel. I'm hoping to keep the hose high enough that there won't be any interference, but it will be close. I'll hopefully be able to tell you more in a week or two, once my panel is installed.


Cool, thanks. I hope the fuel tank doesn't get in the way! I was thinking as you are; as high as far forward as possible seems to be the way to go.

Re: Waiex Build Status and Completion Photos

PostPosted: Sat Nov 19, 2011 7:10 pm
by MichaelFarley56
Hey all, just as a quick update I'm still hacking away at #0056 with hopes that the end is slowly getting closer. Lately I've been working on wiring and engine baffles, both being a lot of fun! (sarcasm...)

Anyway, the controls are now on:

Image

The wingtips minus final light wiring is done:

Image

And I think I just about have the baffles done. I had to trim a lot of the side baffle pieces as well as the oil cooler pieces, but it's getting there:

Image
Image

After some final cowling tweaking I hope to finish the wiring, rivet the panel in place and try to get this thing running. If anyone wants to help by keeping Ohio warm a little bit longer I would appreciate it :D

Re: Waiex Build Status and Completion Photos

PostPosted: Sun Nov 20, 2011 11:13 am
by N111YX
Looks great...:)

Thanks for the update...!

Re: Waiex Build Status and Completion Photos

PostPosted: Sat Nov 26, 2011 2:06 pm
by 142YX
Image

I installed my seat last night.. ended up modifying it from the plans a bit to get a nice fit. My seat ended up being 1/2 inch higher than called out which i am OK with. I modified the 1.25" dimension for the middle piano hinge distance to .75". This gave me a really nice fit with out having to trim & check a hundred times, the existing center cutout worked. I don't see how the seat would fit in place with the clearance hole for the seatbelt brackets, per plans. Also the "Clips" (WIX-F10-08) needed to be trimmed.. no way the seat would go in without doing that.

Re: Waiex Build Status and Completion Photos

PostPosted: Sun Nov 27, 2011 12:18 am
by N111YX
That's perfect. The first time a 200 lb passenger steps in your seat and concentrates all of that weight in one spot, you'll be glad that you had a bit of clearance before the pan hits your lower structure...:)

The workmanship look great...!

Re: Waiex Build Status and Completion Photos

PostPosted: Sun Nov 27, 2011 1:50 am
by MichaelFarley56
N111YX wrote:That's perfect. The first time a 200 lb passenger steps in your seat and concentrates all of that weight in one spot, you'll be glad that you had a bit of clearance before the pan hits your lower structure...:)


If that was me (and it probably was) my apologies...

Re: Waiex Build Status and Completion Photos

PostPosted: Sun Nov 27, 2011 6:57 am
by 142YX
N111YX wrote:The workmanship look great...!


Thanks! I experienced quite the learning curve with my good friend, the fly cutter, chucked into a hand drill when cutting out those control stick holes..

Due to my seat mod, the front part of the seat also ended up being .25~.5 inches farther forward on the spar box than the plans state.. i am nervous that i will have an annoying job of hole enlarging in store for me when i install the control stick assembly.

I am curious, how much clearance do you have between your control stick and the aft edge of the cutout at full aft elevator deflection?

Re: Waiex Build Status and Completion Photos

PostPosted: Sun Nov 27, 2011 11:43 am
by N111YX
I must have forgot to add that to my "problems" forum.

I probably enlarged the seat pan holes 30% of what is shown in the plans. I'm not sure what stick movement range the factory were using but it was way off. It's not a big deal, the pan comes out pretty easily so when you get your control system in you can just trim the holes as you move the sticks to the stops...:)