Page 5 of 12
Re: Waiex Build Status and Completion Photos

Posted:
Sun Nov 27, 2011 2:14 pmby fastj22
I had to do the same as Kip.
Re: Waiex Build Status and Completion Photos
Posted:
Sun Nov 27, 2011 5:27 pmby MichaelFarley56
Same here. I also riveted on a 0.032 doubler to the bottom of the seat where you stand to try and keep anything from getting bent.
Re: Waiex Build Status and Completion Photos
Posted:
Sun Nov 27, 2011 6:40 pmby Andy Walker
Hmm...I wonder if the Waiex control travel is slightly different from the Sonex. That might explain why the Waiex builders are doing this a lot, I have not heard a Sonex builder mention having to enlarge the stick openings. This might be totally wrong, just a thought. If it's the case though, Sonex should update the Waiex plans to account for it.
Re: Waiex Build Status and Completion Photos
Posted:
Sun Nov 27, 2011 7:34 pmby 142YX
I am super bummed.. i was hoping that was not the case. Cutting that opening would have been so much easier when it was just a blank sheet and still flat.. making a new seat would be even worse, to try to get it to line up with the piano hinge already in the airframe. Sonex really neads to put out a rev to the blueprints. :x
Re: Waiex Build Status and Completion Photos
Posted:
Sun Nov 27, 2011 9:48 pmby Andy Walker
If you use a deburr tool like this:
http://www.yardstore.com/browse.cfm/4,5772.htmlYou should be able to remove material exactly where you want very easily and in amounts equal to the pressure applied. You might not even have to remove the seat pan from the airplane. It will take a few passes, but it should work unless you need to remove like a half inch, in which case it will get tedious.
Re: Waiex Build Status and Completion Photos
Posted:
Mon Nov 28, 2011 12:03 amby MichaelFarley56
When I was enlarging the openings in my seat for the full stick travel I didn't measure it...I just trimmed until it worked, but if I were to do it again I would probably take the aft line (the one that runs parallel to the wing spars) and extend it back 1.5-2" to start.
Just mark new lines, grab the fly cutter, and use a wood base under the seat for support when you cut new corners. It's really not that bad. Trust me, you'll have to cut out the opening. Sanding or filing will take forever!
Re: Waiex Build Status and Completion Photos
Posted:
Mon Nov 28, 2011 12:32 amby MichaelFarley56
Well, I didn't get as much done this weekend as I was hoping, but was able to hit one more small milestone.
Here's a preview:
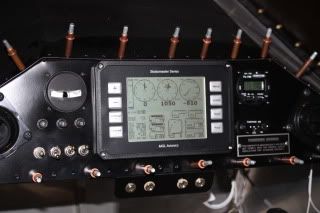
More to follow... ;)
Waiex Build Status and Completion Photos
Posted:
Mon Nov 28, 2011 1:18 amby Sonex1517
Michael
What radio is that in your panel?
Robbie Culver
Sonex 1517
Chicagoland
Aerovee/taildragger
Starting on the wings
Sent from my iPad using Tapatalk
Re: Waiex Build Status and Completion Photos
Posted:
Mon Nov 28, 2011 1:44 amby MichaelFarley56
Hi Robbie,
I have a FlightLine FL-760 Comm radio and a FlightCom 403LSA intercom, both bought at Aircraft Spruce.
I'll hopefully give you a review of them soon, but so far so good. Both are very light, don't take much power, and were pretty inexpensive ;)
Re: Waiex Build Status and Completion Photos
Posted:
Mon Nov 28, 2011 5:31 amby 142YX
MichaelFarley56 wrote:Just mark new lines, grab the fly cutter, and use a wood base under the seat for support when you cut new corners. It's really not that bad.
Ill have to try this.. it was my thought that using a fly cutter after the hole had been cut would be problematic as it hits the edge of the pan with each pass.